3 key takeaways
- Discover the nuances of reverse chronological resumes and how they differ from other types of resumes
- Identify the best situations where a reverse chronological resume can improve your chances of landing your dream job
- Learn how to build a reverse chronological resume with Teal's AI Resume Builder
The reverse chronological resume is the most widely used format in hiring—and for good reason. This resume type presents your career story in a way hiring managers can quickly scan, showing your most recent and relevant experience up front.
Below, you'll learn exactly how to create a great reverse chronological resume, with templates and examples to help you write your own.
What is a reverse-chronological resume?
A reverse-chronological resume is a format that organizes your work history by recency—starting with the most recent position at the top and then proceeding backward in time.
Reverse chronological order means listing items (like years) from newest to oldest. When using reverse chronological order for a resume, this approach showcases how your job title, roles, career growth, responsibilities, and achievements have evolved, offering a clear and linear view of your professional journey.
Why the reverse-chronological resume is the most popular
The reverse chronological format is the most common resume format and dominates the job market for good reason. It presents your career story in a way that hiring managers can quickly scan and understand, with your most recent and relevant experience immediately visible.
Since this format has been the standard US resume format for decades, recruiters and hiring managers can efficiently review your qualifications and career progression, making it the most straightforward choice for most situations.
Simon Geere, an HR recruitment professional, highlights the importance of reverse-chronological resumes:
"As a person who spends the majority of his life wading through CVs, I have to admit that there is a great storytelling element to the chronological CV; career achievements and goals, progression and promotion, pivots, and just seeing what roles people did in what companies for how long can tell you more than just their career outputs. I think at this stage I remain an advocate for the chronological CV for those working in predominantly permanent roles. Interims who land, learn, deliver, and leave, less so!"
When to use a reverse-chronological resume
As the most popular resume format, the reverse-chronological resume is most effective for professionals with clear career progression—particularly within the same field. Here are some additional times when it's the best resume format choice:
- Consistent work history: Ideal for showcasing a steady employment history in the same field, highlighting your commitment and depth of experience.
- Career advancement: If you’ve climbed the ladder in a particular sector, this format demonstrates your professional growth.
- Traditional fields: Sectors like finance and law often favor this conventional format.
If you're shifting careers, have significant employment gaps, or your most relevant experiences are not recent, consider a combination resume that places equal emphasis on your skills and work experience.
If you're still unsure whether this format is a good fit, here are some examples of roles and industries where the reverse-chronological resume tends to work best:
- Operations manager or logistics lead: Ideal for showing how you’ve scaled processes, improved efficiency, and led cross-functional teams.
- Academic professional or researcher: Useful for mapping out your teaching history, publications, fellowships, and institutional roles.
- Attorney or legal associate: Clearly outlines your experience across firms, legal areas, and case types.
- Financial analyst or controller: Highlights progression through increasingly strategic financial responsibilities.
- IT manager or director: Captures growth in managing infrastructure, systems, and cross-team technology initiatives.
- Doctor, nurse, or healthcare provider: Organizes clinical experience, residencies, and certifications in a logical timeline.
- Senior executive (e.g., COO, CFO, VP): Emphasizes leadership, company-wide strategy, and measurable organizational impact.
- Engineer (mechanical, civil, or software): Tracks promotions, projects, technical skill growth, and certifications.
- Marketing strategist or brand lead: Illustrates campaign ownership, performance metrics, and team leadership over time.
- Sales manager or account executive: Reflects quota achievement, client relationships, and progression into senior sales roles.
Now that you’ve seen where this format shines, let’s break down the pros and cons so you can decide if it’s the right fit for your resume.
Reverse-chronological resume pros
- ATS-friendly: Most systems easily parse this standard format
- Quick scanning: Recruiters spend 6-7 seconds initially reviewing resumes
- Shows progression: Demonstrates career growth and stability
- Familiar structure: Hiring managers know exactly where to look
- Highlights recency: Up-to-date experience gets prime real estate
Reverse-chronological resume cons
- Exposes gaps: Employment breaks are immediately visible
- Emphasizes job hopping: Frequent changes stand out
- Less skills focus: Transferable skills may get buried
- Challenges career changers: Unrelated experience appears first
Alternatives to a reverse-chronological resume format
A chronological resume format and a reverse-chronological resume are the same resume layout, just referred to by different names. While these terms are used interchangeably, there are alternative resume formats to choose from, like the functional resume and the combination resume.
Here are some alternatives to a reverse-chronological resume:
- Functional resume: Highlights skills over job history—best for limited experience or career gaps
- Combination resume: Also known as a hybrid resume, this format balances both skills and experience—ideal for technical roles or non-linear paths
.png)
Consider alternatives if you have:
- Significant employment gaps (6+ months)
- Frequent job changes without clear progression
- A career change where your most recent experience isn't relevant
- Limited work experience overall
- Mainly temporary or contract work experience
As David Mendoza, a multilingual specialist and founder, shares:
"If you have big gaps in employment, you might be tempted to use a functional resume, but you know that most recruiters will discard it—it's the sad reality. If you are going with this format, you must maximize your networking game so your resume becomes a formality and the decision-maker focuses on you and your value instead of the piece of paper."
Your best bet in this case would be to craft a resume using one of the other two formats to make your employment gaps less obvious. For example, the combination or hybrid resume allows you to highlight your skills rather than your career progression, providing a good workaround.
We recommend avoiding this format if you're in an entry-level role or have mainly temporary work experience.
Just remember, whichever format you choose, list your experience, internships, education, and achievements in reverse chronological order.
How the reverse-chronological format works with ATS
Applicant Tracking Systems (ATS) are tools that employers use to scan and organize resumes before a human ever sees them. The good news? The reverse-chronological format is ATS-friendly by design.
Because this layout lists your experience clearly—with job titles, dates, and company names in a familiar order—ATS software can easily read and parse your information. That helps your resume stay intact through automated filters.
To make the most of it:
- Use standard section headings like “Work Experience” or “Education.”
- Avoid text boxes, columns, or overly designed templates.
- Include your target title at the top of your resume to align with the role you're applying for.
- Match keywords from the job description naturally within your bullet points and summary.
💡 Pro Tip: Teal’s AI Resume Builder automatically creates ATS-friendly resumes with properly labeled sections, clean formatting, and keyword suggestions based on the job you're targeting.
How to write your sections in reverse chronological order
If you're ready to start creating your reverse-chronological resume format, here's how to get it right. A reverse-chronological resume typically includes:
- Contact information
- Target title
- Professional Summary
- Work experience
- Education
- Skills
- Certifications
- Optional sections like Volunteer Experience or Awards and Scholarships
Each section should build upon the others to create a comprehensive picture of your professional identity. Now, let's get into how to do it.
.webp)
1. Add your contact information
Begin with the basics: your name, phone number, email, and LinkedIn profile. This information should be at the top, making it straightforward for potential employers to contact you. Keep it simple and professional.
⚠️What to watch for: Leaving out your LinkedIn profile or sharing one that’s outdated can hurt your chances. Keep it current and make sure it matches your resume.
2. Optimize your target title
Just below your contact details, specify the job title you're aiming for. This sets a clear direction for your application and shows focus.
Be sure to tailor this title to each job application, reflecting the specific role you're pursuing.
⚠️What to watch for: Don't use generic titles like "Seeking Employment" or "Professional." Instead, use the exact job title from the posting you're applying for. This helps both human reviewers and ATS systems immediately understand your target role.
3. Create a professional summary
Write a resume summary that shows your career highlights and relevant key skills. This is your opportunity to make a strong first impression, so highlight what sets you apart and how your skills align with the job you're applying for.
Try to underscore your unique strengths and how they meet the job requirements. Be engaging and concise.
Template: "[X years] [job title/industry] professional with expertise in [2-3 key skills]. Proven track record of [specific achievement]. Seeking to leverage [relevant strength] in a [target role] position."
⚠️What to watch for: Don't write a generic summary that could apply to anyone. Instead of "Hardworking professional seeking new opportunities," write something specific like "Marketing professional with 5+ years driving digital campaigns that increased lead generation by 40%."
4. Focus on work experience
List your career history in reverse chronological order, starting with your most recent job title. Focus on achievements and impact that resonate with the role you’re targeting.
Use bullet points for clarity and provide quantifiable evidence of your impact where possible.
Format/Template:
Job Title
Company Name, Location
Month Year – Month Year
- Achievement-focused bullet point with quantifiable results
- Another accomplishment that demonstrates impact
- Technical skill or responsibility relevant to target role
- Leadership example or process improvement
⚠️What to watch for: Don't use inconsistent date formats. Pick one format (like "June 2020 – Present" or "06/2020 – Present") and stick with it throughout your entire resume. Inconsistency looks unprofessional and can confuse ATS systems.
5. Add your education
Detail your educational background, leading with your highest degree and spotlighting relevant coursework. This section should demonstrate your academic foundation and how it supports your career goals.
6. Incorporate relevant certifications
Include any certifications that are relevant to the industry and job you’re applying for. These can add weight to your qualifications and show your commitment to professional development.
⚠️What to watch for: Adding every certificate you’ve ever earned can clutter this section. Stick to the ones that are current and relevant to your field.
7. Focus on your skills
Tailor this section to the job description. Highlight both hard and soft skills that are pertinent to the role, demonstrating how your abilities align with the position's needs.
⚠️What to watch for: Dropping in a long list of buzzwords without context can be a red flag. Tailor this section to the job description and choose skills you can back up with examples.
8. Add optional sections
If applicable and relevant to the job you're targeting, add sections like Projects, Awards, Volunteer Work, or Publications. These can provide a fuller picture of your capabilities and interests, distinguishing you as a well-rounded candidate.
Pro Tip: Teal's resume templates offer every section you need to create a reverse-chronological resume—without the manual work.
Tips for a reverse-chronological resume format
Creating a resume that captures the attention of potential employers involves several key strategies:
Lead with a compelling summary: This should be a brief yet powerful summary that shows your relevant career achievements and skills. This section should act as a personal pitch, setting the tone for the rest of your resume.
Emphasize achievements over responsibilities: Focus on accomplishments and impact rather than day-to-day tasks. Incorporate quantifiable data, such as percentages or financial metrics, to substantiate your accomplishments, making them more tangible and impactful to the reader.
Tailor each application: Customize your resume for each job application. This means integrating keywords from the job description and aligning your skills and experiences with the specific requirements of the role.
Remember conciseness and clarity: Aim to keep your resume concise. This doesn't mean omitting important information but rather being selective and succinct in what you choose to include.
Proofread: Avoid spelling or grammatical errors, as they can significantly detract from your qualifications. Carefully proofread your resume multiple times, or consider using a grammar-checking tool to ensure accuracy.
Reverse-chronological resume examples and templates
Now that you know when to use a reverse-chronological order resume, here are some reverse-chronological resume examples and a template to help you create your own.
Reverse-chronological resume example – Senior Project Manager
This example of a chronological resume is a strong representation of the reverse chronological format.

Reverse-chronological resume example – Software Development Intern
This reverse-chronological resume example for an entry-level resume focuses on relevant details even with limited work experience.

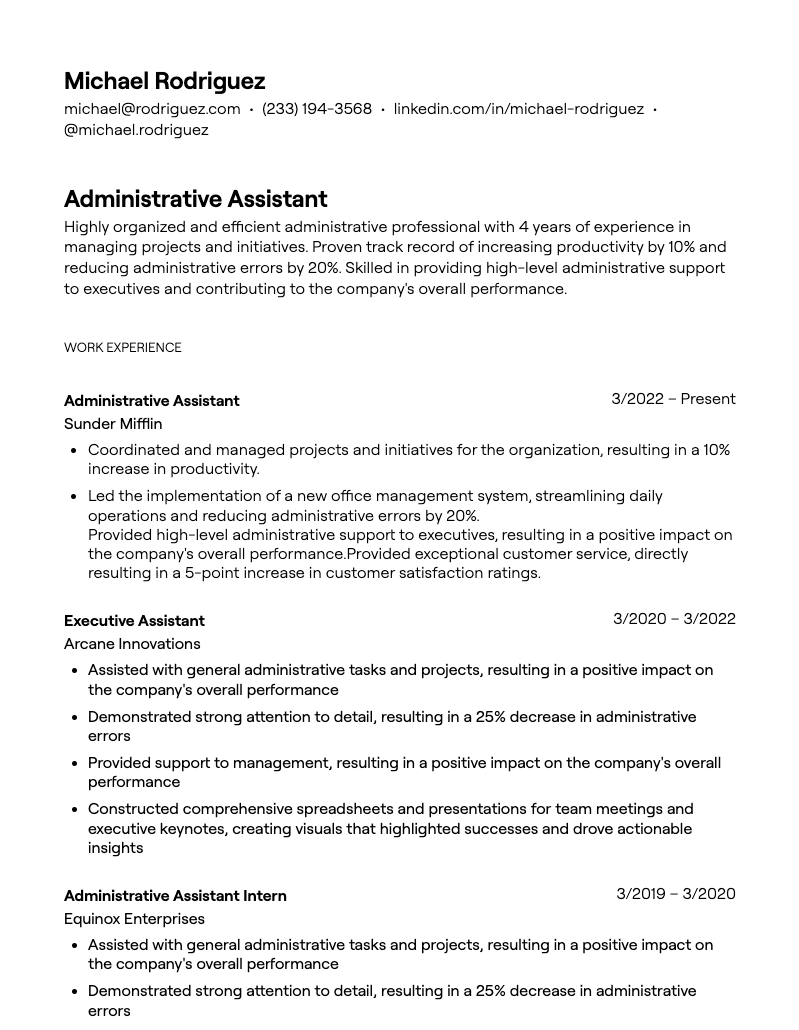
Reverse-chronological resume example – Administrative Assistant
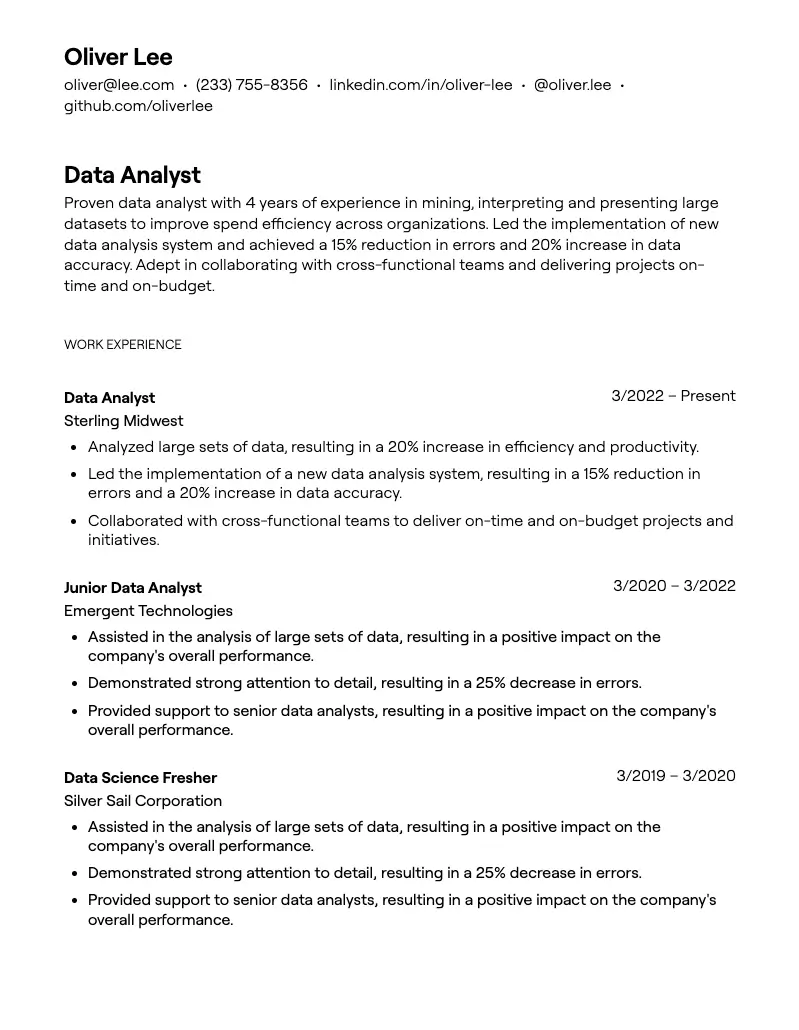
Reverse-chronological resume example – Data Analyst
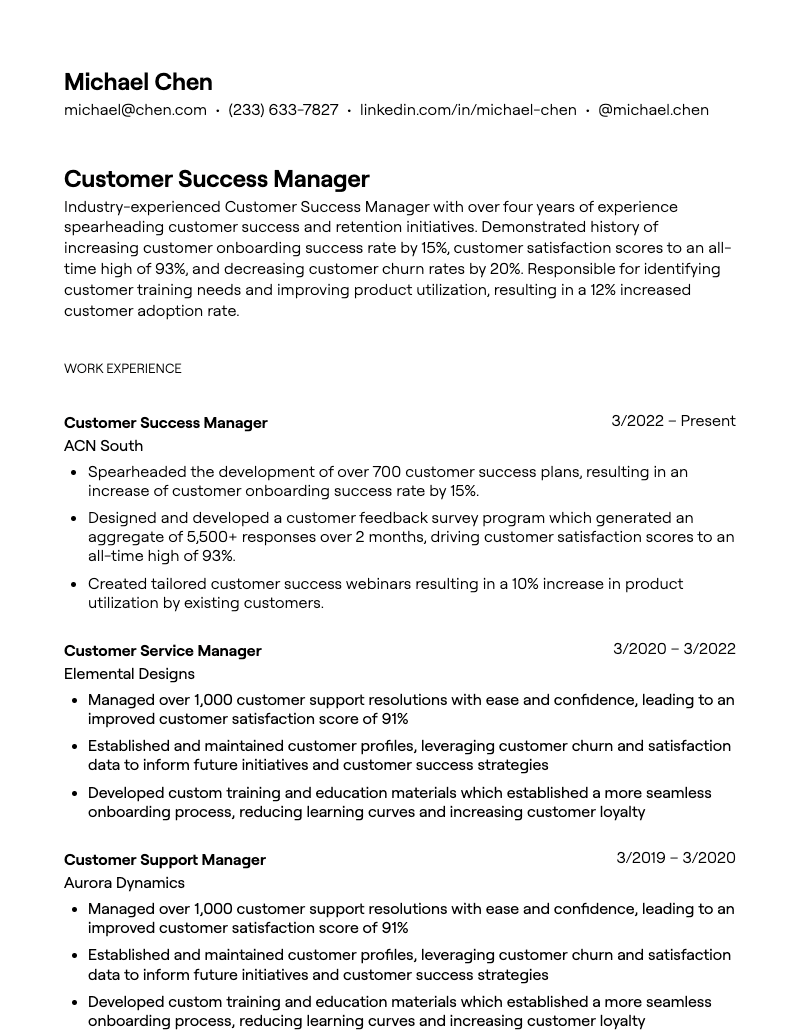
Reverse-chronological resume example – Customer Success Manager
Reverse-chronological resume example – Field Engineer
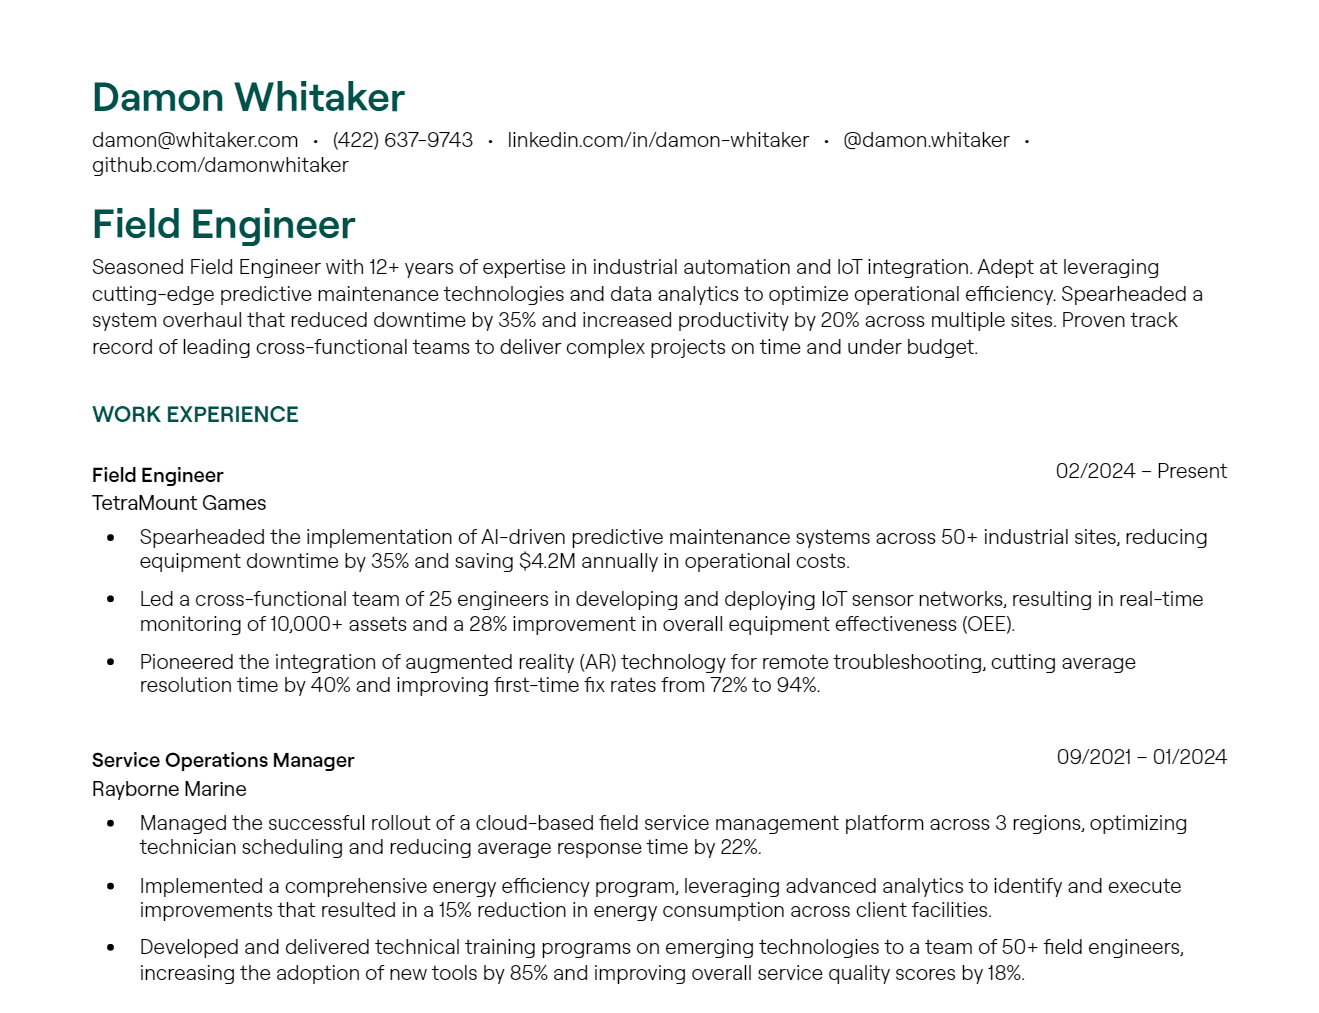
Reverse-chronological resume example – Accountant
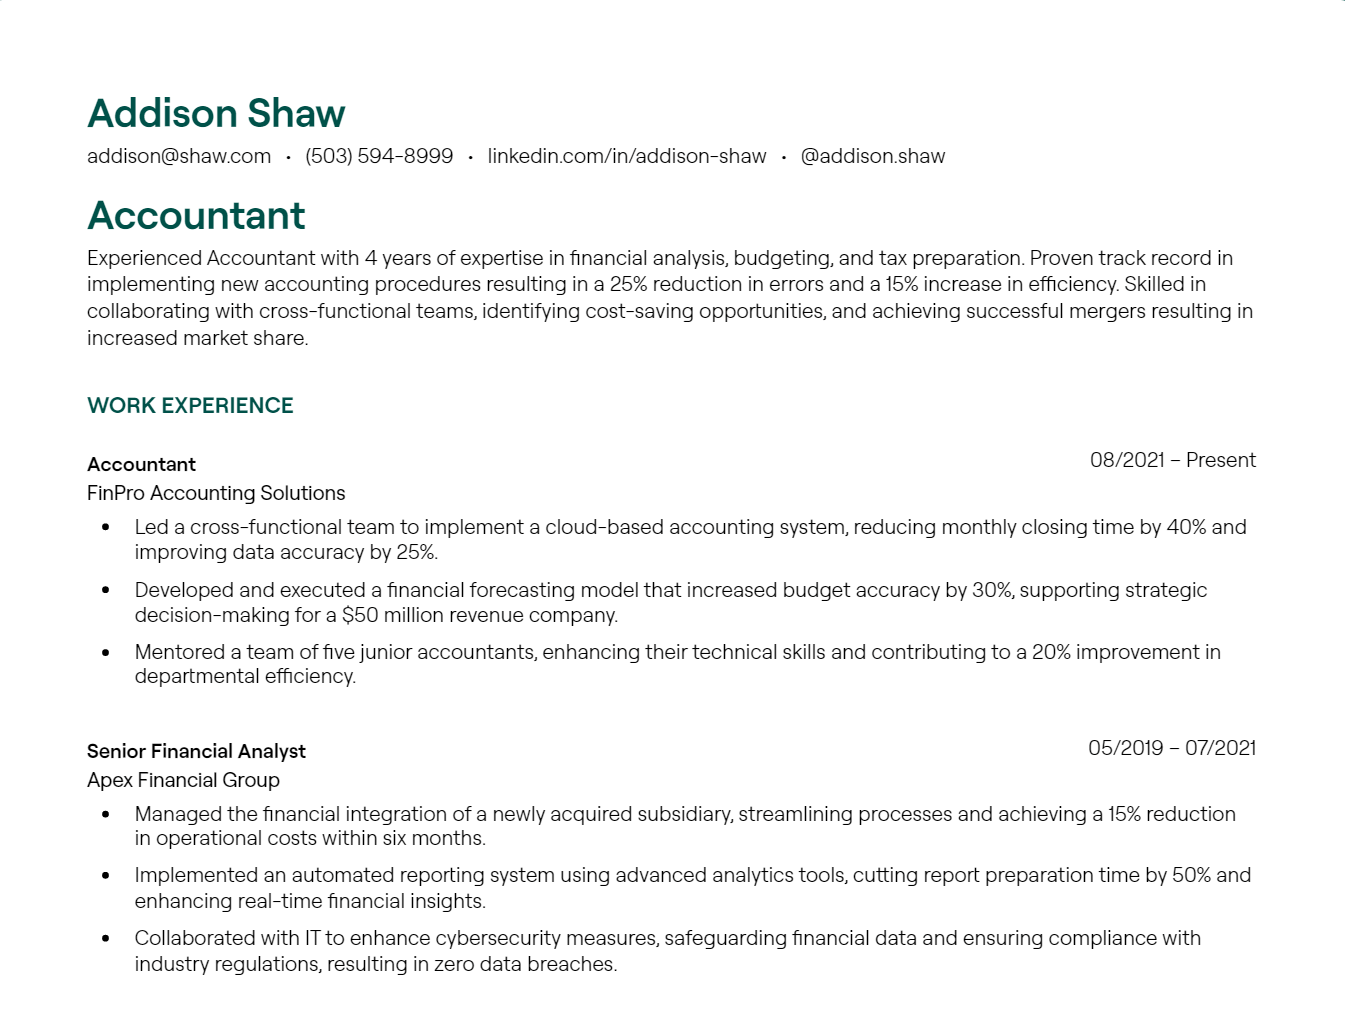
Reverse-chronological resume example – Talent Acquisition Manager
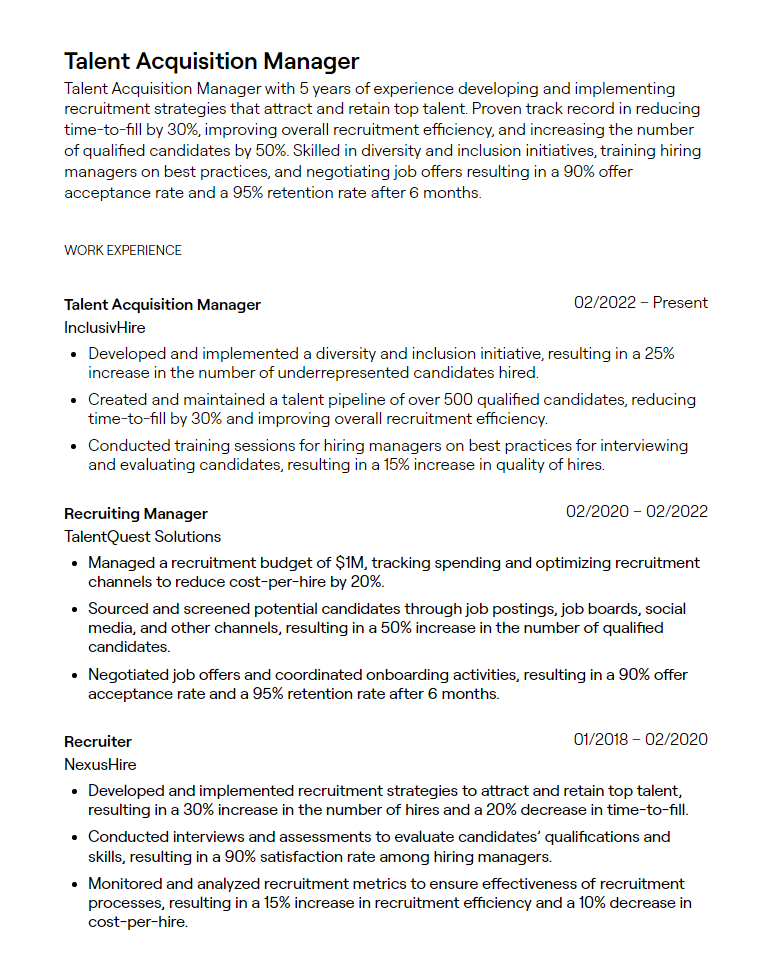
Reverse-chronological resume example – Sales Manager
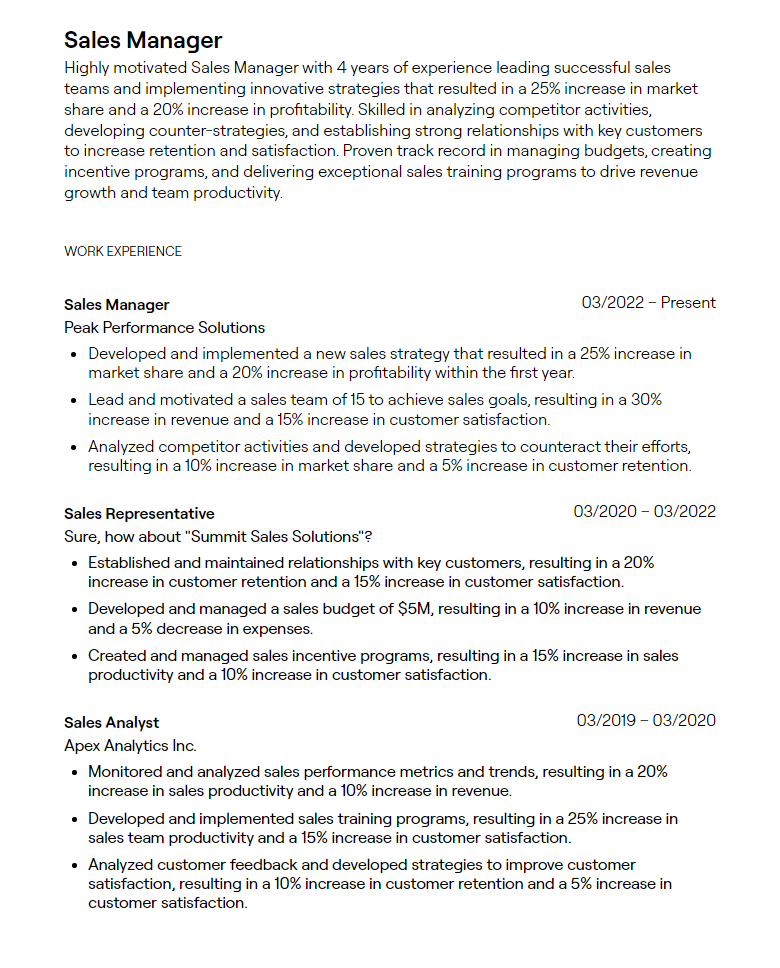
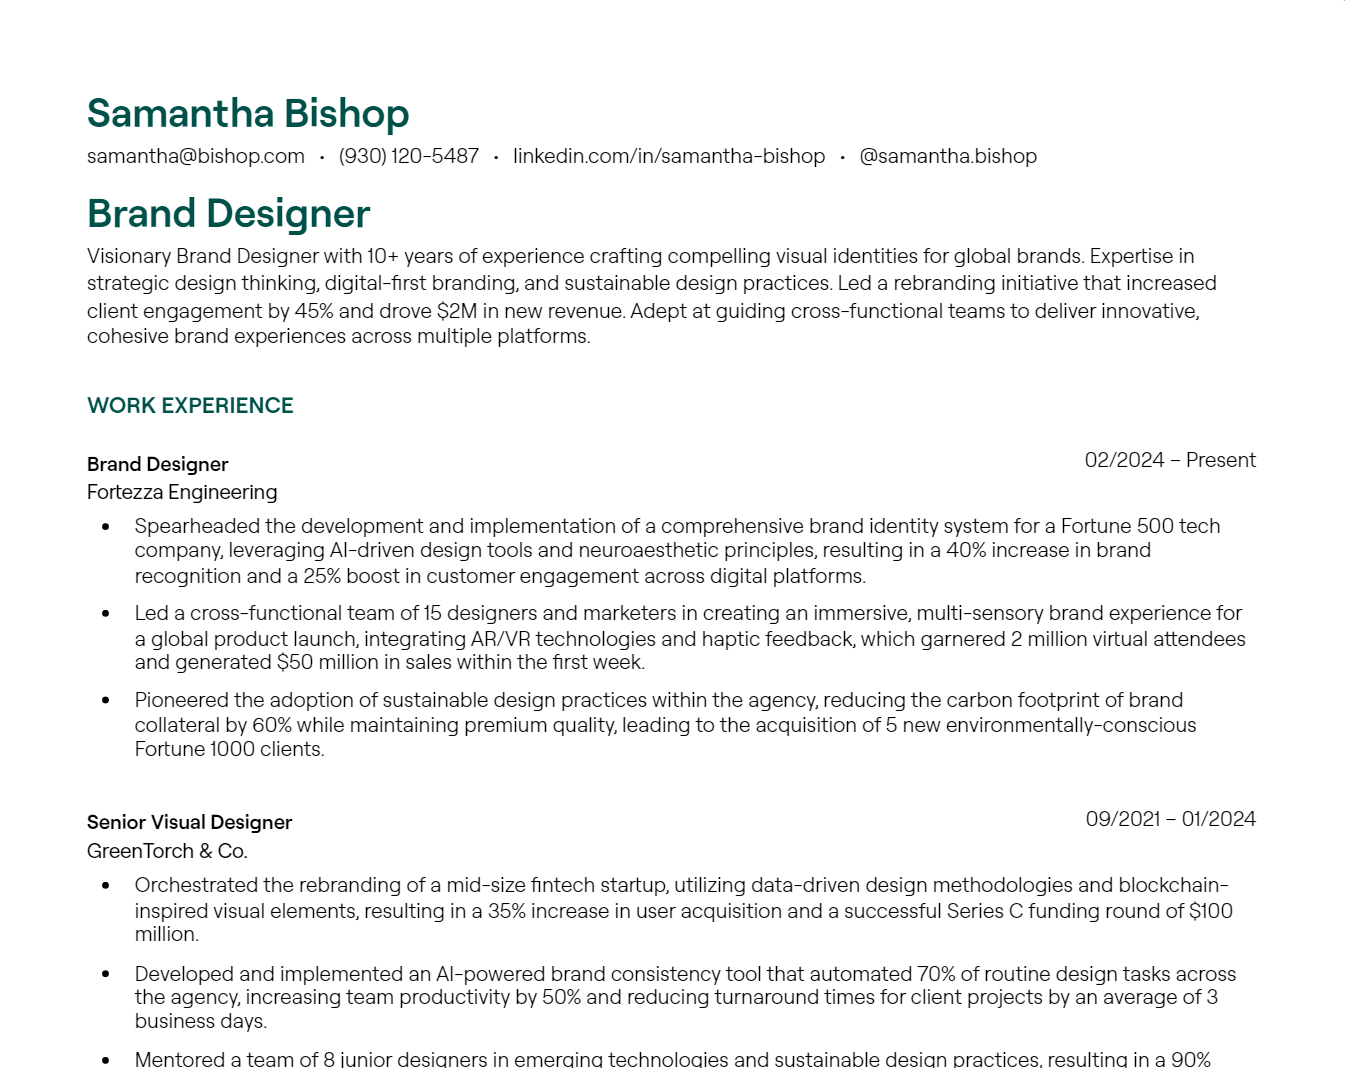
Reverse-chronological resume example – Brand Designer
Sample reverse-chronological resume – IT Support Specialist
This reverse-chronological resume sample focuses on a specific job title with supporting employment history (working backward) and skills.

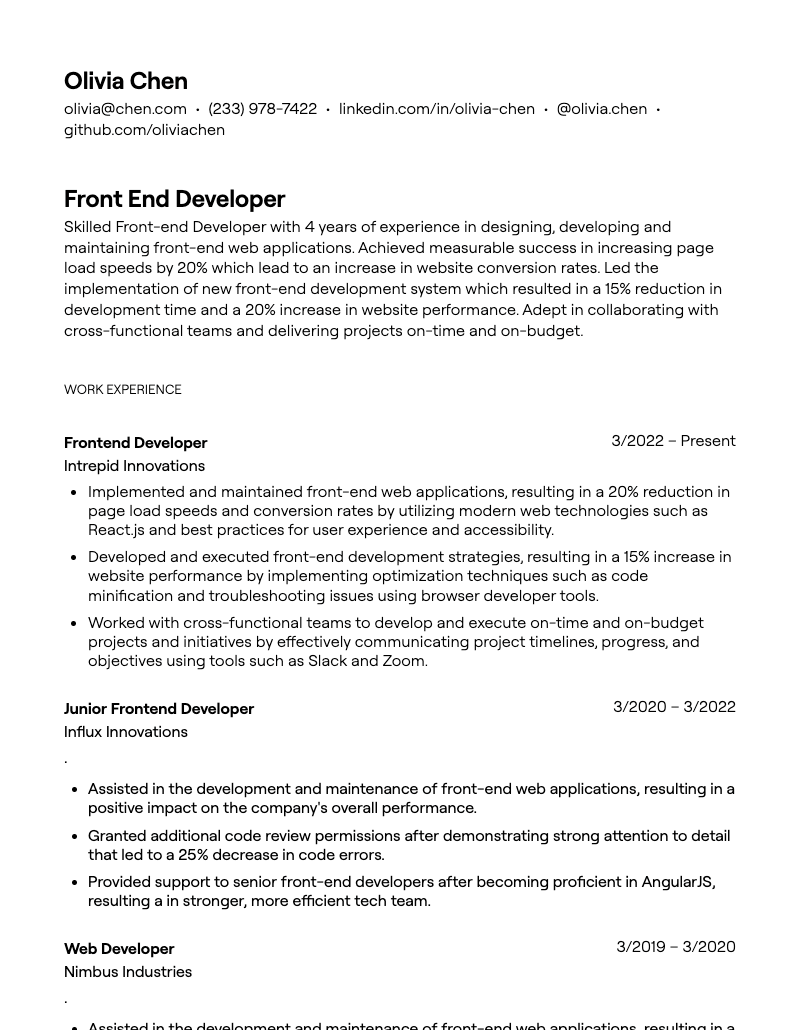
Sample reverse-chronological resume – Front End Developer
Reverse-chronological resume template
If you're looking to highlight your career progression and experience over time in reverse chronological order, here’s a reverse-chronological resume template:
[Your Name]
[Your Phone Number] • [Your Email Address] • [LinkedIn Profile] • [Portfolio Link, if applicable]
Professional Summary
A brief 2-3 sentence summary highlighting your key skills, relevant experience, and career objectives.
Professional Experience
[Job Title]
[Company Name], [Location]
[Month Year – Month Year]
• Bullet 1
• Bullet 2
• Bullet 3
• Bullet 4
• Bullet 5
(Repeat for each position, listing recent or relevant positions with 3-5 bullet points and older or less relevant roles with 1-3 bullet points.)
Education
[Degree, Major] – [School Name], [Location]
[Graduation Date]
Skills
• Relevant Skill 1
• Relevant Skill 2
• Relevant Skill 3
Certifications
[List relevant certifications or licenses.]
Reverse-chronological resume template for career change
For pivoting into a new field while showing your work history:
[Your Name]
[Phone Number] • [Email Address] • [LinkedIn Profile] • [Portfolio, if applicable]
Professional Summary
[Previous role or field] professional with [#] years of experience, now transitioning into [target field]. Recently completed [course, bootcamp, or certification] with hands-on projects and strong foundation in [new skills]. Known for [transferable skill or strength].
Professional Experience
[Freelance or Transitional Role or Project Title]
[Company Name or "Freelance"], [Location]
[Month Year – Month Year]
• Bullet describing key accomplishments or deliverables in the new field
• Bullet with tools, research, or frameworks used
• Bullet showing outcome or success metric
[Previous Job Title]
[Company Name], [Location]
[Month Year – Month Year]
• Bullet showing relevant transferable skill
• Bullet with project, campaign, or client result
• Bullet highlighting leadership, collaboration, or cross-functional work
Education and Training
[Credential or Certificate] – [Issuer], [Year]
[Degree, Major] – [School Name], [Location], [Year]
Skills
• [Skill 1]
• [Skill 2]
• [Skill 3]
• [Skill 4]
✅ Start with this template if you're making a career move but want to keep your experience timeline clear.
Quick recap: Reverse-chronological resume
- What it is: A reverse-chronological resume lists your most recent experience first and works backward. It’s the most widely used resume format—and for good reason.
- When to use it: Best for professionals with a steady career history, those in traditional industries, or anyone who wants to highlight recent roles and achievements.
- How to write it: Start with a professional summary. List your work experience, education, and skills in reverse order—beginning with the most recent. Tailor each section to the job you’re applying for.
- Mistakes to avoid: Don’t leave unexplained gaps. Avoid burying your strongest experience down the page. Watch out for inconsistent formatting or keyword mismatches with the job description.
- ATS tip: Reverse-chronological resumes are highly compatible with applicant tracking systems (ATS), which most recruiters use to screen resumes. A clear format improves your chances of passing through.
- Helpful tools: Use Teal’s AI Resume Builder and resume templates to organize your sections, optimize keywords, and create polished, job-ready resumes—fast.
Write a great reverse-chronological resume today
The reverse-chronological resume remains the standard format for US job applications because it works. When crafted correctly, it presents your experience in a way hiring managers can quickly understand and evaluate. Following the guidelines above will help you create an effective resume—and Teal's AI Resume Builder makes the process even easier.
Start building your reverse-chronological resume with Teal today. The AI Resume Builder handles the formatting automatically, from section organization to proper spacing, so you can focus on what matters: showcasing your achievements and experience.
Ready to create your reverse-chronological resume?
Frequently Asked Questions
How do you write in reverse-chronological order?
To write in reverse-chronological order, list your most recent experience first and then work backward. This applies to work history, education, and certifications, ensuring that hiring managers see your latest and most relevant qualifications upfront. Use bullet points to highlight key achievements and impact for each role.
Is the reverse-chronological format still the best resume format in 2025?
Yes, the reverse-chronological resume remains the best format in 2025 for most job seekers. It is the most widely recognized by recruiters, showcases career progression clearly, and prioritizes recent, relevant experience. However, those with career gaps or making a major career shift may benefit from a combination resume instead.
Are resumes supposed to be in reverse chronological order?
Yes, most resumes should be in reverse chronological order, as this format makes it easier for hiring managers to assess a candidate’s experience quickly. It ensures that your most recent and relevant roles are the first thing employers see. Alternative formats like functional or combination resumes may be better suited for career changers or those with employment gaps.


